前言
Tab 切换是种很常见的网页呈现形式,不管是PC或者H5都会经常看到,今天就为小伙伴们提供多种纯CSS Tab 切换的实现方式,同时对比一下那种代码更方便,更通俗易懂。

纯CSS实现都面临2个问题:
1、 如何接收点击事件?
2、 如何操作相关DOM?
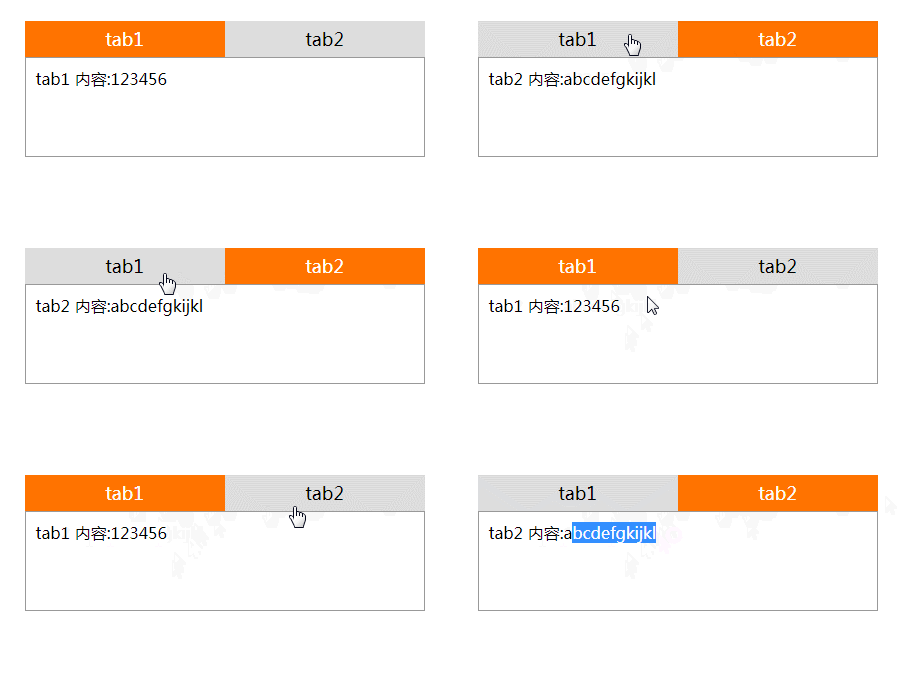
checked 伪类实现纯 CSS Tab 切换
拥有 checked 属性的表单元素, <input type="radio"> 或者 <input type="checkbox"> 能够接收到点击事件。
知识点:
1、 使用 radio 标签的 :checked 伪类,加上 <label for> 实现纯 CSS 捕获点击事情
2、 使用了 ~ 选择符对样式进行控制
<style>
.container *{
  padding: 0;
  margin: 0;
}
.container {
  position: relative;
  width: 400px;
  margin: 50px auto;
}

.container input {
  display: none;
}

.nav {
  position: relative;
  overflow: hidden;
}

.nav li {
  width: 200px;
  float: left;
  text-align: center;
  background: #ddd;
  list-style: none;
}

.nav li label {
  display: block;
  width: 200px;
  line-height: 36px;
  font-size: 18px;
  cursor: pointer;
}

.content {
  position: relative;
  overflow: hidden;
  width: 400px;
  height: 100px;
  border: 1px solid #999;
  box-sizing: border-box;
  padding: 10px;
}

.content1,
.content2 {
  display: none;
  width: 100%;
  height: 100%;
}

.nav1:checked ~ .nav li {
  background: #ddd;
  color: #000;
}
.nav1:checked ~ .nav li:first-child {
  background: #ff7300;
  color: #fff;
}

.nav2:checked ~ .nav li {
  background: #ddd;
  color: #000;
}
.nav2:checked ~ .nav li:last-child {
  background: #ff7300;
  color: #fff;
}

.nav1:checked ~ .content > div {
  display: none;
}
.nav1:checked ~ .content > div:first-child {
  display: block;
}

.nav2:checked ~ .content > div {
  display: none;
}
.nav2:checked ~ .content > div:last-child {
  display: block;
}

.nav li.active {
  background: #ff7300;
  color: #fff;
}

.content .default {
  display: block;
}
</style>
<div class="container">
  <input class="nav1" id="li1" type="radio" name="nav">
  <input class="nav2" id="li2" type="radio" name="nav">
  <ul class='nav'>
    <li class='active'><label for="li1">tab1</label></li>
    <li><label for="li2">tab2</label></li>
  </ul>
  <div class="content">
    <div class="content1 default">tab1 内容:123456</div>
    <div class="content2">tab2 内容:abcdefgkijkl</div>
  </div>
</div>
target 伪类实现纯 CSS Tab 切换
知识点:
1、 要使用 :target 伪元素,需要 HTML 锚点,以及锚点对应的 HTML 片段
2、 核心是使用 :target 伪类接收点击事件
3、 通过兄弟选择符 ~ 控制样式
<style>
.container *{
  padding: 0;
  margin: 0;
}
.container {
  position: relative;
  width: 400px;
  margin: 50px auto;
}

.nav {
  position: relative;
  overflow: hidden;
}

li {
  width: 200px;
  float: left;
  text-align: center;
  background: #ddd;
  list-style: none;
}

li a {
  display: block;
  width: 200px;
  line-height: 36px;
  font-size: 18px;
  cursor: pointer;
  text-decoration: none;
  color: #000;
}

#content1,
#content2 {
  position: absolute;
  overflow: hidden;
  top: 36px;
  width: 400px;
  height: 100px;
  border: 1px solid #999;
  box-sizing: border-box;
  padding: 10px;
}

#content1,
#content2 {
  display: none;
  width: 100%;
  background: #fff;
}

#content1:target,
#content2:target {
  display: block;
}

#content1.active {
  display: block;
}

.active ~ .nav li:first-child {
  background: #ff7300;
  color: #fff;
}

#content1:target ~ .nav li {
  background: #ddd;
  color: #000;
}
#content1:target ~ .nav li:first-child {
  background: #ff7300;
  color: #fff;
}

#content2:target ~ .nav li {
  background: #ddd;
  color: #000;
}
#content2:target ~ .nav li:last-child {
  background: #ff7300;
  color: #fff;
}

.wrap {
  position: absolute;
  overflow: hidden;
  top: 36px;
  width: 400px;
  height: 100px;
  border: 1px solid #999;
  box-sizing: border-box;
}
</style>
<div class="container">
  <div id="content1" class="active">tab 1内容:123456</div>
  <div id="content2">tab 2内容:abcdefgkijkl</div>

  <ul class='nav'>
    <li class="active"><a href="#content1">tab1</a></li>
    <li><a href="#content2">tab2</a></li>
  </ul>

  <div class="wrap"></div>
</div>
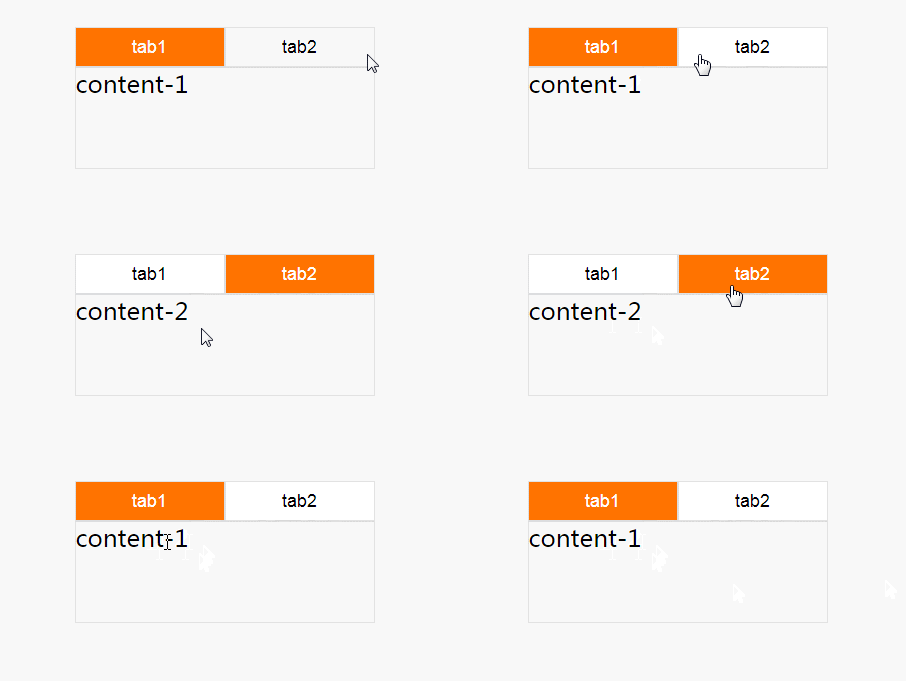
focus-within 来实现 tab 切换功能
:focus-within 它表示一个元素获得焦点,或该元素的后代元素获得焦点。重点:它或它的后代获得焦点。
这也就意味着,它或它的后代获得焦点,都可以触发 :focus-within。
知识点
1、 这个属性有点类似 Javascript 的事件冒泡,从可获焦元素开始一直冒泡到根元素 html,都可以接收触发 :focus-within 事件
2、 本例子的思路就是通过获焦态来控制其他选择器,以及最重要的是利用了父级的 :not(:focus-within) 来设置默认样式
<style>
.container {
  width: 300px;
  margin: 50px auto;
  padding: 10px;
  boder: 1px solid #ddd;
}

.nav-box {
  font-size: 0;
}

button {
  width: 150px;
  height: 40px;
  box-sizing: border-box;
  outline: none;
  background: #fff;
  border: 1px solid #ddd;
  font-size: 18px;
  cursor: pointer;
}

button:focus-within {
  color: #fff;
  background: #ff7300;
}

.content-box {
  font-size: 24px;
  border: 1px solid #ddd;
  height: 100px;
}
.content-box div {
  display: none;
}

.nav-box:not(:focus-within) .nav1 {
  color: #fff;
  background: #ff7300;
}
.nav-box:not(:focus-within) .content1 {
  display: block;
}

.nav1:focus-within ~ .content-box .content1 {
  display: block;
}

.nav2:focus-within ~ .content-box .content2 {
  display: block;
}
</style>
<div class="container">
  <div class="nav-box">
    <button class="nav1">tab1</button>
    <button class="nav2">tab2</button>
    <div class="content-box">
      <div class="content1">
        content-1
      </div>
      <div class="content2">
        content-2
      </div>
    </div>
  </div>
</div>

这个效果就很差一些,因为,在tab失去焦点时,就会复原,回到tab1上面,并不推荐这种方式来实现。小编推荐第一种:checked实现方式,更容易理解。
正文结束
图片
Ctrl + Enter


